
If you have spent anytime on our Join Us pages, you will notice that some of our custom reflectors us odd port numbers. We do this, so that we can host several reflectors on the same server. The problem with this is the fact that pi-star blocks all but the basic ports. To get around this problem you have to open those ports.
Now the question is; How do I open the needed ports? Good question, this How To will walk you through opening those needed ports.
The first thing you will need to do, is login to your pi-star device. Click on configuration.

After clicking on Configuration you may be asked to login, login with pi-star and the default password of raspberry. Once logged in the menu will change. Click on the Expert menu item. Then click on the SSH Access menu item.

That will start a SSH Terminal window. You will need to login again using the same user id and password that you used before. Once you are logged in you will need to become super user. Type the follow command and press the enter key:
sudo su
Your prompt will change indicating you are now the root user. Next you will need to move to the root directory, to do that type the following and press the enter key:
cd /root
We will now need to make the file system writable. By default pi-star file system is read only. If we try to leave it read only we will not be able to create the files we need. So to make it writable type the following and press the enter key
rpi-rw
The next thing we need to do is create a special file. This file will allow pi-star to open the need ports. To create the file type the follow and press the enter key:
nano ipv4.fw
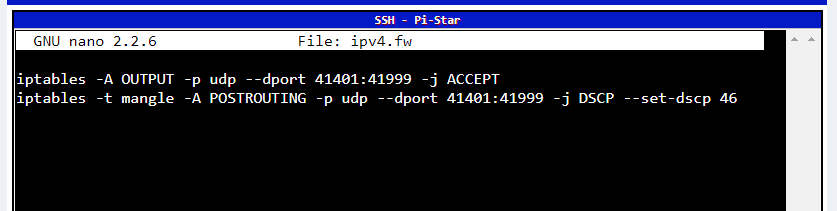
The above command will create the ipv4.fw file and open a text editor called nano. Nano is a simple editor that will allow us to enter the information we need to add the firewall rules. You will need to enter the following line as pictured below. After each line press the enter key to start a new line. Make sure you enter the lines just as pictured below. Any mistakes or typos will cause errors in the firewall, which may cause problems with pi-star.
Once you have added the lines press the follow commands to save the file. Press the Control Key with the O key. This will prompt you to save the file. Just press the enter key and the file will save. Then you may press the Control Key with the X key to exit out of Nano. You will then be back and the command prompt.
Type exit twice to close the ssh window, as we are done with it at this point.
The only thing left is to update pi-star to get the new firewall changes added. To update pi-star simply click on the update command and allow it to run. It might take a few minutes to complete depending on how long ago you updated the pi-star system.
There you have, you have now added custom firewall settings to your pi-star. We hope you have enjoyed this How To and it helps you enjoy more digital modes with pi-star. Be sure to join us on Triangle NC DMR Talk group.