
This topic comes up every once in a while, and now that we are hosting Fusion Fridays, I figured it was time to come up with this How To. The basic idea of this, is to allow you to use your favorite DMR Radio an connect into the Fusion Network. We currently have 2 YSF Reflectors that you can test and play on once you get done with this How To.
To be clear, this How To will only work with a pi-star device. If you are using something like an OpenSpot, this will NOT work for you. I know it can be done on the OpenSpot, but I don’t have access to one to create a How To for that.
There are 2 ways to setup your DMR to YSF Cross Mode. I will expain both ways in this How To. The way you chose to set it up depends on your equipment and needs. I will explain the good and bad of each solution as I walk you through the setup.
Enjoy this How To and hope to hear you on YSF soon.
DMR to YSF using DMR Gateway
The first way to set this up is up is to use the built in DMR Gateway. With this options, you can still use your HotSpot on DMR along with YSF. There is some tricks to setting up a code plug on your radio, but I will explain that to you below.
Lets get started. Open the dashboard of the Pi-Star device you want to setup this on. Click on the Configuration menu option and log in (User ID: pi-star Password: raspberry).

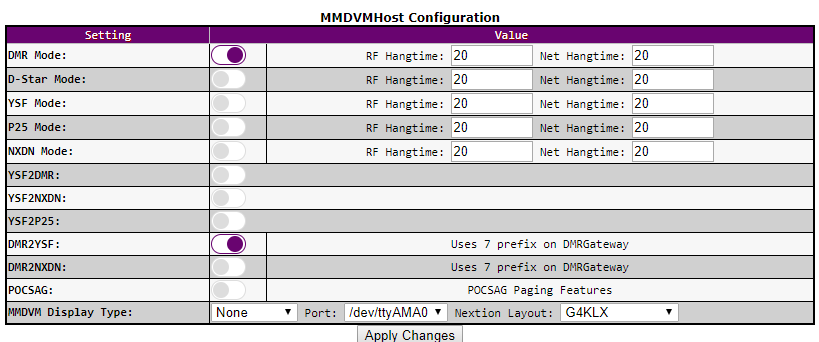
Once you are logged in that will leave you on the main configuration page for Pi-Star. Scroll down to the MMDVM Host Configuration section. You need to make sure DMR is enabled and you will need to enable DMR2YSF option as pictured below. You can then press the Apply Changes button, which will save the changes and return you right back to the configuration page.
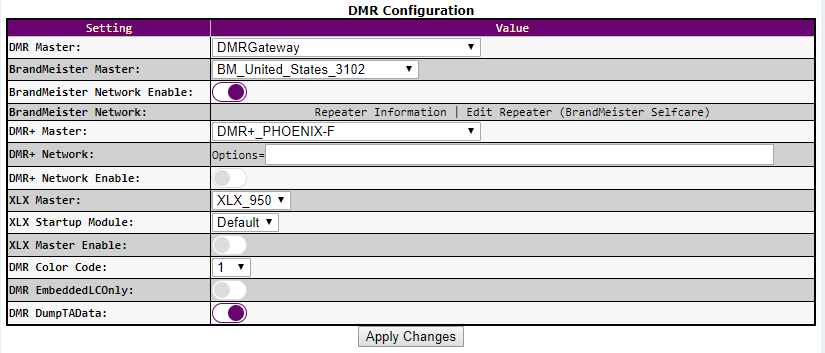
Then scroll down to the DMR Configuration section. Select DMR Gateway for DMR Master. It will be the first item in the selection dialog box. Once selected, press the Apply Changes button.
Once saved, scroll back down to DMR Configuration, you will notice that there a lot more options now. The only options we care about is the BrandMeister Master and BrandMeister Network Enable. Select your favorite BrandMeister server from the list, and make sure you enable the BrandMeister Network Enable, or DMR will stop working. You can press the Apply Changes or you can continue on to the next step.
Now scroll down to Yaseu System Fusion Configuration section. Here we will select which YSF/FCS reflector we want to start on. Select that in the YSF Startup Host Drop down. The other thing we need to adjust is the UPPERCASE Hostfiles, we want this disabled. It will be enabled by default. Once you have made your changes, press the Apply Changes button.

There is only one more thing we need to do. That is to update Pi-Star. Simply click on the Update Menu options and let it do its thing. Once it is finished you are done with the Pi-Star changes.
The only other thing you will need to do is setup a code plug in your radio. It is beyond the scope of this How To, on how to setup code plugs. I would suggest just adding a YSF Zone on your favorite DMR Radio. For each Reflector you want to use, you must append either a 70 or 71 in front of the ID Number. for example;
For our main YSF Reflector (76864) you would set the talk group id to 707684. For our Net Reflector (08106) you would set it to 7008106.
For FCS Reflectors you will add the 71 in front of the ID. So America Ragchew (00285) would be 7100285.
There you have it, your are now set to use DMR 2 YSF using the DMR Gateway, next I will show you how to set it up with DMR2YSF direct.
DMR2YSF Direct
The other option you have to do the DMR 2 YSF is to use it direct. The major draw back to this method, is you can not use DMR on this hotspot. If you want to dedicate a hotspot for this mode, then this is a great option for you.
To get started, open your pi-star dashboard and click on Configuration menu option and login (UserID: pi-star, Password: raspberry).
This will put us on the main configuration page, scroll down to the MMDVM Host Configuration section. We need to make sure that DMR and DMR2YSF Modes are enabled. Once you have enabled these options, press the Apply Changes button.

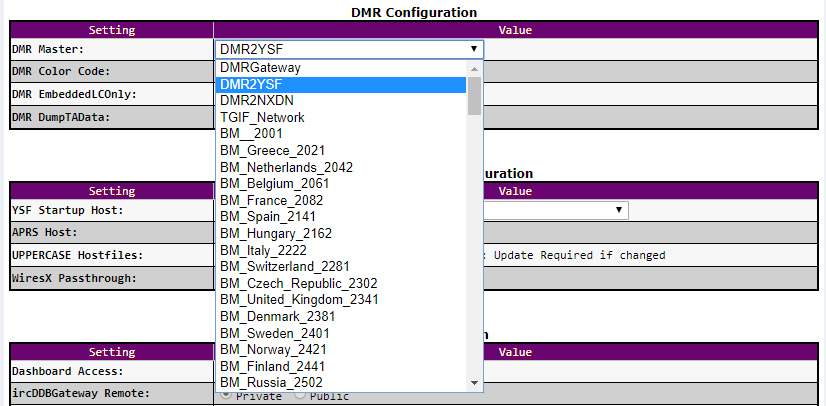
Once the options are saved, scroll down to the DMR Configuration section. You will want to select the DMR2YSF option under DMR Master. Click on the Apply Changes button. We don’t care about any other setting in that section.
Once saved, scroll down to the Yaesu System Fusion Configuration section. There are only 2 options you need to change. For YSF Starup Host, select the YSF/FCS Reflector you want to start with. Then make sure that UPPERCASE Hostfiles is disabled. This option will be enabled by default. Press the Apply Changes.

Once your changes are saved you will need to do a Pi-Star update by clicking the Update menu option and allow Pi-Star to do its update. Once it is completed, that is all you need to do for Pi-Star.
The only other thing you will need to do is setup a code plug in your radio. It is beyond the scope of this How To, on how to setup code plugs. I would suggest just adding a YSF Zone on your favorite DMR Radio. For each YSF Reflector you want to use, you simply use the ID number for that Reflector. for example;
For our main YSF Reflector (76864) you will just use 76864 for the Talk Group ID. For our Net Reflector (08106) you will use 08106.
For FCS Reflectors you will need to append a 10 to the front of the ID. So for America Ragchew (00285) you would use 1000285 for the Talk group id.
Conclusion
It is not hard to start using your DMR Radio to talk on the Fusion Network. With a few simple steps you can have it working in no time. In this How To I have shown you the 2 ways of setting up DMR2YSF. I hope this helps you getting started in the Fusion Network.
Thanks for checking out this How To and I will look forward to chatting with you on our YSF reflectors.
Nice Job Rich!!
NIce article. I am still a bit confused. I need to use Detroit II for YSF which is 78880. I have setup my pistar exactly as you show and I have setup my Anytone to use TG 7078880. I hear nothing. I have validated my setup on the radio as well as pistar.
I noticed that when I xmit, pistart does recognize the TG 7078880 and it shows I am making the gateway. The TG is in its own receive group but added to my DVMEGA zone.
As soon as someone transmits in another TG such as 91, the pistar is switching to that TG and not remaining on 7078880.
What am I doing wrong?
Thank you Rich!
After watching the W1MSG video and failing with the 7 prefix, I saw this blog.
Odd, I can get DMR from my MMDVM to end up on the local repeater’s wires-X room using 70xxxxx and 71xxxxx but under no circumstances does traffic return from the YSF/Wires-X network to my MMDVM. Nothing in the Dashboard or Admin indicates network-receive. A packet capture on the firewall shows no inbound traffic being blocked. Since I’m the admin for the YSF remote base Wires-X link (HRI-200 plus FTM400 to a DR-2X on a WIn10PC) I can see my hotspot’s traffic inbound. There are 18 repeaters linked and everyone can hear my DMR inbound to YSF/Wires-X. However, none of the network traffic ever makes it back to my MMDVM in DMRGateway.
Curiously, if I set it up in DMR2YSF mode instead of DMRGateway, the issue goes away and it works fine. But I also lose the ability to use other DMR TGs/Networks on the MMDVM.
I know it has to be something simple, but it really feels like it’s either an option not on the control screen (perhaps in Expert page) or there’s some other odd quirk about return traffic in DMRGateway mode.
If I end up finding the cause/cure/more-info I’ll comment again. if you’ve got insight, please share 😉
Thanks!
73 Joe N8CN