
Jonathan Naylor (G4KLX) has released the P25 Reflector software, so anyone can now setup and run their own P25 Reflector. That is great for anyone wanting to run and use their own P25 Reflector, but how do we access it? In Pi-Star it is much simpler then you may think.
Craig Gagner (W1MSG) has created the above video to walk you step by step to adding your custom P25Host file to the Pi-Star system. Once you follow his steps, not only will you get the “Official” list of P25 Reflectors, but you will have access to any Reflector you have added.
We have also listed the steps below, so that you can walk through them.
Adding the P25Hosts.txt
All of the steps below assume you have a working version of Pi-Star and have it configured. If you have not setup Pi-Star then check out some of Craig’s other videos on installing and setting up Pi-Star.
- Open the Admin Expert for your Pi-Star. http://your_pi_star/admin/expert/
- On the Menu, click on SSH Access
- A Terminal window will open and login in as pi-star using whatever password you have setup for your system. If you have not changed your password, then use the system default password of raspberry.
- Once logged in you will need root access. To get that type sudo su at the prompt and press enter. You will notice that the prompt has changed and you now have root access to the system.
- You will now need to change to the root directory by typing cd /root and press enter.
- If you type ls and press enter you will see a list of the other host files. You will notice there is now P25Hosts.txt file in that list. That is the file will will be creating.
- You will now need to put the Pi-Star system into read/write mode by typing rpi-rw and press enter. This command will allow us to add the file we will need.
- To create the P25Hosts.txt file type in nano P25Hosts.txt and press enter. Please Note that you must type in the name just as I have. It has a capital P and a capital H, if you do not include the capitals as I have shown Pi-Star will not find the P25Hosts.txt file and the steps below will not work correctly.
- Now you will need to enter your P25 Reflector information. The first then you need to enter is the TalkGroup Number. Then hit tab and enter the host, this can be in the form of an IP Address or a DNS Name. Then hit tab and enter the Port Number for the Reflector. This will normally be 41000. See the screen shot.
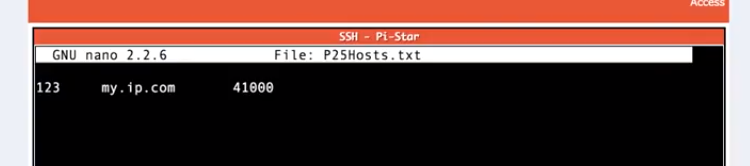
- Once you have your information entered press Ctrl-O to save the file and then press Ctrl-X to exit the Nano editor.
- We are now done with the SSH Window. Enter exit and press enter to exit root mode, then enter exit and press enter to terminate the ssh session.
- Now you will need to select the Update menu option to perform a system update. This will refresh all of the host files as well as check for system updates.
- Once the update is completed, Click on the Configuration menu item and scroll down to the P25 Configuration section.
- If you click on the P25 Startup host list, you should now see your new host in the list.
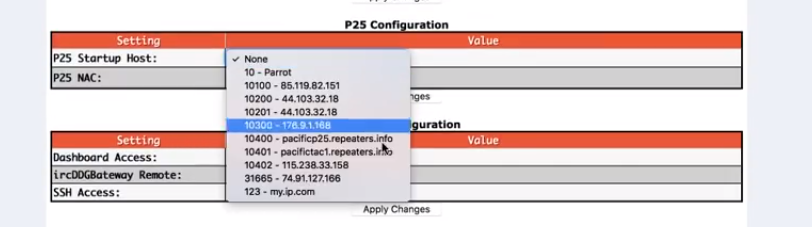
- At this point you are now ready to go. You can set your new host as the P25 Startup Host or modify your codeplug to select your new host on Push to Talk.
We hope you have enjoyed this walk through and we look forward to bringing you more posts like this one. We would also like to take the time to thank Craig (W1MSG) for all of his hard work on producing the video used in this post. be sure to catch him and other hams on the Triangle NC P25 Reflector. Click here to get more information on our reflector.
Still have questions? Leave a comment below or post a question in our Forums.
Until next time 73’s
Rich (KD7LMN)
is there a way to do this in YSF Fusion
No you can not. There is no YSF Host file and a YSF Reflector has to registered. Sorry.